Building and Uploading to PyPi
Learning Objectives
In the following section we will …
Review the packaging terminology
Understand how to build, package and publish a python package
Packaging Terminology 101
Introduction
This section reviews the key python packaging concepts and definitions.
PyPI
PyPI is the default Package Index for the Python community. It is open to all Python developers to consume and distribute their distributions.
There are two instances of the Package Index:
PyPI: Python Package Index hosted at https://pypi.org/
TestPyPI: a separate instance of the Python Package Index (PyPI) that allows you to try out the distribution tools and process without worrying about affecting the real index. TestPyPI is hosted at https://test.pypi.org
Reference: https://packaging.python.org/glossary/#term-python-package-index-pypi
pip
The PyPA recommended tool for installing Python packages.
A multi-faceted tool:
It is an integration frontend that takes a set of package requirements (e.g. a requirements.txt file) and attempts to update a working environment to satisfy those requirements. This may require locating, building, and installing a combination of distributions.
It is a build frontend that can takes arbitrary source trees or source distributions and builds wheels from them.
Reference: http://pip.readthedocs.io/
PyPA
The Python Packaging Authority (PyPA) is a working group that maintains many of the relevant projects in Python packaging.
The associated website https://www.pypa.io references the PyPA Goals, Specifications and Roadmap as well as Python Packaging User Guide, a collection of tutorials and references to help you distribute and install Python packages with modern tools.
Reference: https://www.pypa.io
Source distribution
Synonyms: sdist, Source release
provides metadata + source files
needed for installing
by a tool like pip
or for generating a Built Distribution
Reference: https://packaging.python.org/glossary/#term-source-distribution-or-sdist
Built Distribution
Synonyms: bdist
provides metadata + pre-built files
only need to be moved (usually by pip) to the correct locations on the target system
Reference: https://packaging.python.org/glossary/#term-built-distribution
Python Distribution: pure vs non-pure
pure:
Not specific to a CPU architecture
non-pure
Platform specific
Reference: https://packaging.python.org/glossary/#term-module
Binary Distribution
is a Built Distribution
is non-pure
uses platform-specific compiled extensions
Reference: https://packaging.python.org/glossary/#term-binary-distribution
Wheel
a Built Distribution
a ZIP-format archive with .whl extension
{distribution}-{version}(-{build tag})?-{python tag}-{abi tag}-{platform tag}.whl
described by PEP 427
Reference: https://packaging.python.org/glossary/#term-wheel
Wheels vs. Conda packages
Wheels |
Conda packages |
|---|---|
Employed by pip, blessed by PyPA |
Foundation of Anaconda ecosystem |
Used by any python installation |
Used by conda python installations |
Mostly specific to Python ecosystem |
General purpose (any ecosystem) |
Good mechanism for specifying range of python compatibility |
Primitive support for multiple python versions (noarch) |
Depends on static linking or other system package managers to provide core libraries |
Can bundle core system-level shared libraries as packages, and resolve dependencies |
To learn more about Conda, see Conda Packages section.
Virtual Environment
An isolated Python environment that allows packages to be installed for use by a particular application, rather than being installed system wide.
Learn more reading Creating Virtual Environments
Build system
Synonym: Build backend
setuptools associated with the wheel package form the default build system. They support the creation of source and built distributions based on a
setup.pyand optionally asetup.cfgfile.flit is an alternative backend allowing to also create (and also publish) built distributions.
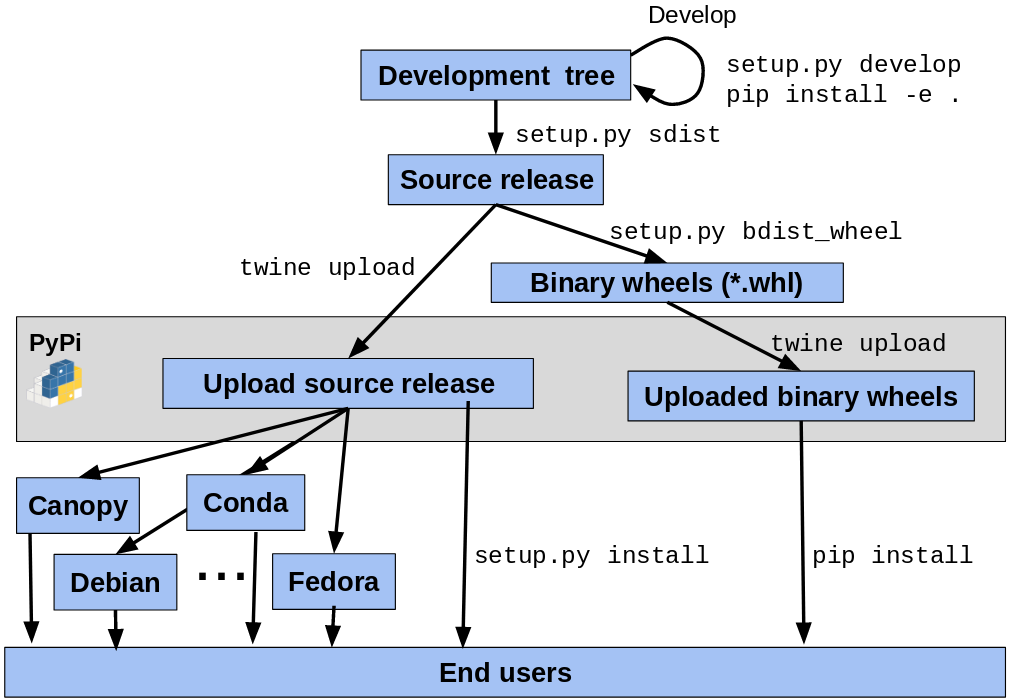
Python Package Lifecycle
Tutorial
Introduction
This section discusses how to build python packages (or distributions) and publish them in a central repository to streamline their installation. Finally, we conclude with exercises where we publish a package with the Test Python Package Index.
Creating an environment
Before developing or building your distribution, we highly recommend to create a
dedicated environment. This is supported by both conda and pip.
Building a source distribution
By leveraging the setup.py script, setuptools can build a source
distribution (a tar archive of all the files needed to build and install the package):
$ python setup.py sdist

$ ls -1 dist
SomePackage-1.0.tar.gz
Building a wheel
$ pip wheel . -w dist

$ ls -1 dist
SomePackage-1.0-py2.py3-none-any.whl
This is equivalent to:
$ python setup.py bdist_wheel
Installing a wheel
Install a package from PyPI:
$ pip install SomePackage
[...]
Successfully installed SomePackage
Install a package from TestPyPI:
$ pip install -i https://test.pypi.org/simple SomePackage
[...]
Successfully installed SomePackage
Install a package file:
$ pip install SomePackage-1.0-py2.py3-none-any.whl
[...]
Successfully installed SomePackage
For more details, see QuickStart guide from pip documentation.
Installing a source distribution
$ pip install SomePackage-1.0.tar.gz
    [...]
Successfully installed SomePackage
It transparently builds the associated wheel and install it.
Publishing to PyPI
twine utility is used for publishing Python packages on PyPI.
It is available as both a conda and a pypi package.
Learn more reading Using TestPiPY.
Exercises
Exercise 1: Prepare environment
In the context of this tutorial, because participants already installed miniconda, we will create a conda environment and install packages using
conda install SomePackage.
# create and activate a dedicated environment named "hello-pypi"
conda create -n hello-pypi -y -c conda-forge
conda activate hello-pypi

# install pip, wheel and twine
conda install -y twine wheel pip
Create an account on TestPyPI (https://test.pypi.org/account/register/)
Exercise 2: Build source distribution and wheel
conda install -y wget
wget https://github.com/python-packaging-tutorial/hello-pypi/archive/master.zip
Extract sources
conda install -y unzip
unzip master.zip
cd hello-pypi-master
Modify package name so that it is unique
Then, build the source distribution:
$ python setup.py sdist
And finally, build the wheel:
$ pip wheel . -w dist
Make sure artifacts have been generated in the
distsubdirectory.
Exercise 3: Publish artifacts on PyPI
$ twine upload --repository-url https://test.pypi.org/legacy/ dist/*
Bonus Exercise 4: Publish artifacts automating authentication
Delete
hello-pypi-masterdirectory and extract archive again.Update name of package and rebuild source distribution and wheel.
Create file
.pypircin your home directory with the following content:
[distutils]
index-servers=
    pypi
    testpypi

[testpypi]
repository: https://test.pypi.org/legacy/
username: your testpypi username
password: your testpypi password

[pypi]
username: your testpypi username
password: your testpypi password
Publish package on TestPyPI:
$ twine upload --repository testpypi dist/*
Omitting the -repository testpypi argument allows to upload
to the regular PyPI server.
Bonus Exercise 5: Setting up continuous integration
See branch master-with-ci branch associated with
hello-pypiexample.
Resources
Where do I go to figure this out?
This is a really good guide:
Python Packaging User Guide:
and a more detailed tutorial:
http://python-packaging.readthedocs.io/en/latest/
Follow one of them
There is a sample project here:
https://github.com/pypa/sampleproject
(this has all the complexity you might need…)
You can use this as a template for your own packages.
Here is an opinionated update – a little more fancy, but some good ideas:
https://blog.ionelmc.ro/2014/05/25/python-packaging/
Rather than doing it by hand, you can use the nifty “cookie cutter” project:
https://cookiecutter.readthedocs.io/en/latest/
And there are a few templates that can be used with that.
The core template written by the author:
https://github.com/audreyr/cookiecutter-pypackage
And one written by the author of the opinionated blog post above:
https://github.com/ionelmc/cookiecutter-pylibrary
Either are great starting points.